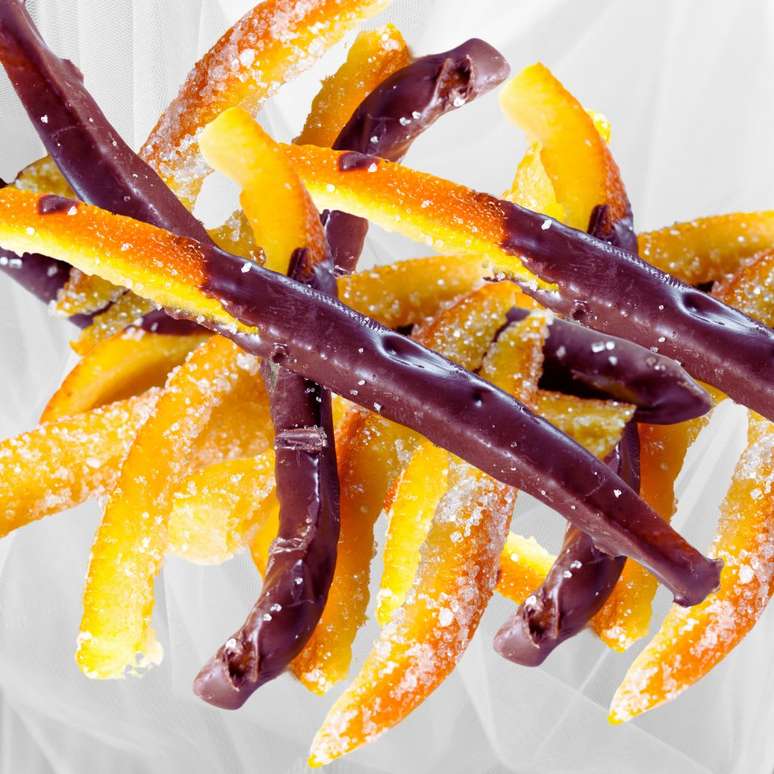
Use orange peels that would otherwise go to waste by making this crystallized citrus dessert with chocolate
A candied orange with chocolate recipe that uses only 3 ingredients and uses orange zest
Recipe for 2 people.
Classic (no restrictions), Vegetarian
Preparation: 01:30 + drying time
Intermission: 00:20
TOOLS
1 cutting board(s), 1 frying pan(es), 1 colander(s), 1 baking tray(s) (or more – shallow), 1 non-metallic bowl(s), 1 cooking thermometer, 1 spatula(s) (- for the chocolate), 1 wire whisk, 1 slotted spoon
EQUIPMENT
conventional + microwave (optional)
METERS
cup = 240 ml, spoon = 15 ml, teaspoon = 10 ml, teaspoon = 5 ml
Ingredients candied orange peel
– 3 units of Bahia oranges, large (peels – without the white part) – prefer Bahia oranges (or pear oranges)
– 1 1/2 cups refined sugar
– 3/4 cup(s) of water
Ingredients TO COMPLETE:
– granulated sugar to taste (optional)
BATH INGREDIENTS:
– 100g semi-sweet chocolate – or to taste
PREPARATION:
- Separate the ingredients and utensils for the recipe.
- Line the baking tray(s) with baking paper or aluminum foil just enough to accommodate the striped orange peels, without overlapping them.
- Prepare the orange peels, prefer the Bahia orange because it is larger and has a thicker peel (see preparation).
PREPARATION:
Orange peel:
- Wash the fruit well.
- Make shallow cuts as if you wanted to cut in half.
- Turn them over and make another shallow cut as if you wanted to divide them into 4.
- Using your hand, remove the shells.
- Divide each “quarter” of peel in half, remove all the white part, first using a serrated knife and then, when there is very little left, scrape it away.
- Finish the entire above process with all the orange peels.
- Check that all the white part has been eliminated and cut it into long strips, 0.5 cm thick.
- Place the peel strips in a pan, cover with water and once it boils, cook for about 5 minutes.
- Drain them with a sieve and eliminate the water.
- Repeat this process two more times, for a total of 3 bubbles.
Candied orange peel:
- After the third boil, remove the water and return the orange strips to the pan.
- Add refined sugar and water to obtain a syrup (see quantities in the ingredients).
- Place the pan on a low heat until it boils and do not stir because the oranges will have become sugary.
- Let a syrup form: after boiling, observe the large bubbles that form on the surface and check if the syrup drips more slowly, forming larger drops: this is the right point.
- Remove the cones with a slotted spoon, let them drain well and arrange them without stacking them on the lined trays.
- Save the syrup to make cake syrup, use it for pancakes, and even make marinades for pork or chicken.
- Allow to dry at room temperature for up to 24 hours or until no longer solid. If you want to cover them with crystalline sugar (optional), do not let them dry completely.
- Discard the aluminum foil or butter if there is any dirt. Line the molds again to place the orange peels after dipping them in the chocolate.
Candied orange peel – Finish (chocolate dipping):
- To do this step the oranges must be completely dry.
- Temper the milk chocolate, following the instructions HERE. The quickest method is on stone, but there are other options.
- Semi-sweet chocolate must be melted, cooled to 27°C and then brought to 31 or 32°C.
- Dip the tips of the oranges in the tempered chocolate.
- Arrange, without overlapping, on the lined baking trays.
- Place in the fridge for 15 minutes – or long enough for the chocolate to harden and become crunchy.
- Important: Unused chocolate can be stored for later use, requiring you to repeat the tempering process if necessary.
FINALIZATION AND ASSEMBLY:
- Save the candied orange peels with chocolate in well-closed airtight containers at room temperature, in a dry and ventilated place, without heat sources.
Do you want to make this recipe? Access the shopping list, HERE.
To see this recipe for 2, 6, 8 people, Click here.
Create your personalized menu for free on Bake and gourmet cakes.

Source: Terra
Ben Stock is a lifestyle journalist and author at Gossipify. He writes about topics such as health, wellness, travel, food and home decor. He provides practical advice and inspiration to improve well-being, keeps readers up to date with latest lifestyle news and trends, known for his engaging writing style, in-depth analysis and unique perspectives.


