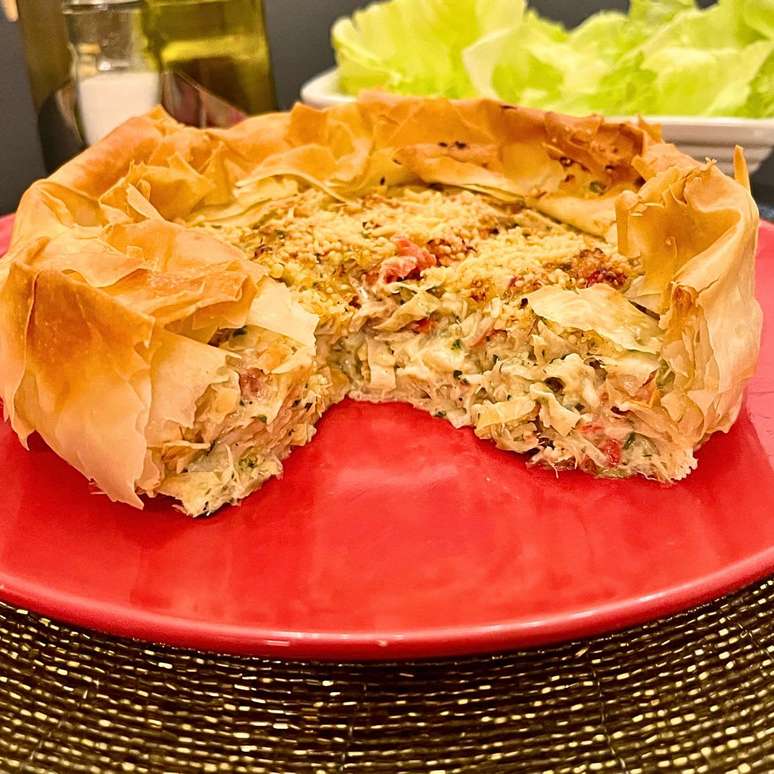
Cod pie with phyllo dough, easy to prepare! Creamy filling and crunchy dough: ideal to amaze on any occasion
Enjoy this cod pie with phyllo pastry: creamy filling, crunchy pastry and an irresistible appearance. Ideal for surprising and easy to make
Recipe for 4 people.
Classic (no restrictions)
Preparation: 01:00 + cooling time for the filling
Interval: 00:30
TOOLS
1 cutting board(s), 2 pan(s), 1 springform pan, 1 brush(es), 1 grater
EQUIPMENT
conventional
METERS
cup = 240 ml, spoon = 15 ml, teaspoon = 10 ml, teaspoon = 5 ml
Filo dough ingredients:
– 300 g of frozen phyllo dough
– olive oil to taste for brushing the pasta
Ingredients for the cod filling:
– 600 g of desalted cod fillet, without skin and bones, cut into medium pieces
– 2 small onions, sliced
– 4 clove(s) of garlic, minced
– 1 unit of finger-de-moça pepper, seedless, chopped
– 2 bay leaves
– 2 ripe tomatoes, without seeds, cut into cubes
– 2 leeks, cut into slices
– 1 lemon (zest)
– parsley to taste, chopped
– green onion to taste, chopped
– 1 tablespoon(s) of wheat flour
– 1 cup(s) of milk
– 100 g of cream cheese (or ricotta cream)
– 4 tablespoons of olive oil
– salt to taste
– pepper to taste
Ingredients TO COMPLETE:
– breadcrumbs to taste
– parmesan to taste, grated
Ingredients TO ACCOMPANY:
– seasoned green leaves (optional)
PREPARATION:
- Remove the filo pastry from the freezer and leave it at room temperature until ready to use.
- Separate the ingredients and utensils for the recipe. If your cod is not desalted, check out tips for doing the process here.
- Lightly press the desalted cod with absorbent paper to eliminate excess liquid and start cooking the cod – see preparation.
- Prepare the vegetables: peel and slice the onion, chop the garlic cloves, cut and remove the seeds from the chilli pepper(s), wash and cut the tomato(s) into cubes, cut the leek into slices (5 mm ).
- Wash the lemon to remove the zest.
- Wash and dry the parsley and spring onion, chop them and set them aside on absorbent paper.
PREPARATION:
Cod – Cooking (do this step during pre-preparation):
- Place the milk in a saucepan, add the cod and cook over a high heat.
- When it boils, turn off the heat, cover the pan and leave to cool.
- In the meantime, go back to pre-prep and follow the remaining steps.
Cod – (continued):
- Remove the cooked cod from the pan and reserve the milk.
- If necessary, remove the skin and bones from the cod and cut it into medium-sized pieces.
Cod filling:
- In a pan, over medium heat, sauté the onion slices in the olive oil until translucent.
- Add the garlic cloves and chilli and sauté for another 2 minutes.
- Add the cooked cod and season with salt and pepper. Stir, reduce the heat to medium/low and cook for a few minutes until soft.
- Add the tomato(s) and leek and cook a little more – don’t overcook as it will go into the oven anyway.
- Sprinkle the flour evenly over the filling and mix immediately, stirring well to combine completely and avoid lumps. Cook for 1 minute to eliminate the raw flour flavor.
- Gradually add the reserved milk, stirring constantly, to control the consistency of the filling. Stop adding as soon as there is enough liquid to incorporate the ingredients and obtain a creamy consistency, avoiding the filling becoming too liquid.
- Then add the cream cheese or ricotta cream and cook over medium heat for about 2 minutes to thicken.
- Turn off the heat and add the spring onion and chopped parsley. Add lemon zest directly on top of the filling.
- Taste the filling before finishing and add salt if necessary, considering that parmesan can add salt to the recipe.
- Set aside and let it cool.
Filo Pasta – Assemble in pan:
- While the filling cools, grease the springform pan with olive oil.
- Preheat the oven to 200ºC.
- Cut the dough into strips of about 10cm, long enough to cover the bottom, sides and top of the dough so that the excess is turned over the filling at the end.
- Note: Filo dough is extremely delicate and may tear during handling. If this happens, place another strip of dough, brushing lightly with olive oil to bring the layers together. This will help maintain the texture and flaky finish of the cake.
- Place the first strip of dough in the pan, allowing the tip to hang over the side of the pan.
- Brush the dough with a light coating of olive oil to ensure the dough is puffy but not greasy.
- Rotate the pan and place another slice of pastry slightly overlapping the first and brush again.
- Repeat the operation with the other slices, always rotating the pan, until the entire pan is covered with the dough – brush each strip of added dough so that once cooked they remain well swollen.
- Continue layering the dough, using the same method and always leaving the edges interspersed with the previous ones: the number of layers will guarantee the appearance of the cake.
- Finally line the bottom of the pan with another strip of dough.
- Spread a thin layer of breadcrumbs on the last layer to prevent the filling from moistening the dough.
Cod pie with filo pastry – Assemble and bake:
- When the filling is completely cold, distribute it inside the dough. Mix the parmesan with the breadcrumbs and spread over the surface of the cake.
- We turn the edges of the dough over the filling, covering about 1/3 of the surface.
- Place in the preheated oven at 200°C and cook for about 30 minutes or until the filling is hot and the shortcrust pastry is golden.
- If the pastry starts to brown before the filling heats through, cover the pie with aluminum foil and lower the temperature to 350°F.
FINALIZATION AND ASSEMBLY:
- Remove cod pie with filo pastry remove from the oven and let rest 5 minutes before cutting, to stabilize the filling.
- Serve the cake with a well-dressed salad or other side dish of your choice.
Do you want to make this recipe? Access the shopping list, HERE.
To see this recipe for 2, 6, 8 people, Click here.
Create your personalized menu for free on Bake and gourmet cakes.
Source: Terra
Ben Stock is a lifestyle journalist and author at Gossipify. He writes about topics such as health, wellness, travel, food and home decor. He provides practical advice and inspiration to improve well-being, keeps readers up to date with latest lifestyle news and trends, known for his engaging writing style, in-depth analysis and unique perspectives.


