Brazilians must obtain a visa to travel to Canada, but anyone with a valid American visa can enter with an electronic authorization
Since 2017, Brazilians have been able to travel to Canada taking with them only the electronic travel authorization, the so-called eTA. To obtain the document, three requirements are mandatory: 1) possess a valid American visa at the time of requesting the eTA; 2) get to Canada by air; 3) have a plan to visit the country for up to six months (the exact length of stay is defined by the immigration officer).
If you meet all the requirements, you can apply for the eTA. Simply access the Canadian government website, enter your passport number and the acronym of the country in which it was issued, your American visa number and fill out the form with questions about nationality, profession and address. In the end, you will have to pay a fee of 7 Canadian dollars using a debit or credit card. The eTA is valid for five years during the validity of your passport, i.e. if your passport expires two years after obtaining the eTA, you will need to apply for a new electronic travel authorization.
If you do not meet any of the three requirements, obtaining a tourist visa will be mandatory to travel abroad. Canada. The document is valid for ten years, but you can only stay in the country for six months at a time. Separate your passport and follow the steps below.
Step 1. Decide what type of visa you need to travel to Canada
The document you need to issue depends on the purpose of your trip. The tourist visa, also called temporary resident, is used for tourism and visits to family and friends. It is also possible to study, but only for six months. For longer stays it is necessary to apply for a student visa of the S-1 or SW-1 category (on the Canadian government website you can find out which application to submit).
Take a step 2. Create an account on the Canadian government website
The visa application is made online on the Canadian government website. To create an account, you must enter your email and receive an access code. Before logging in for the first time you must set a password and create security questions that will be used for future logins. It is important to say that the website is only available in the official languages of Canada English and French.
Step 3. Find out if you are eligible to apply for a visa
You must answer the purpose of your trip, the duration, the presence of family members Canada what is your destination province and if you have already lived in WE so that the system then determines whether you are authorized to apply for the visa.
Step 4. Create a checklist with the necessary documents
On the government website, answer a few more questions to receive a personalized checklist with the documents to send. There are questions about previous travel, financial support, employment and criminal records. You must also specify if you are addressing multiple people at the same time, because it is possible to use the same account to make requests to other members of the same family unit.
Step 5. Launch the application
You have 60 days to complete the request, so during this period your data is saved and you can interrupt the process to complete it at another time. If you do not complete the request within the deadline, it will automatically be cancelled.
Step 6. Submit the documents
The Canadian government requires documents to be translated into English or French. It is not necessary to translate your identity card or passport, but rather financial proof, professional certifications and employer declarations. A standard must be followed: translations must be carried out by certified translators or must be accompanied by a sworn declaration of faithful adherence to the original document.

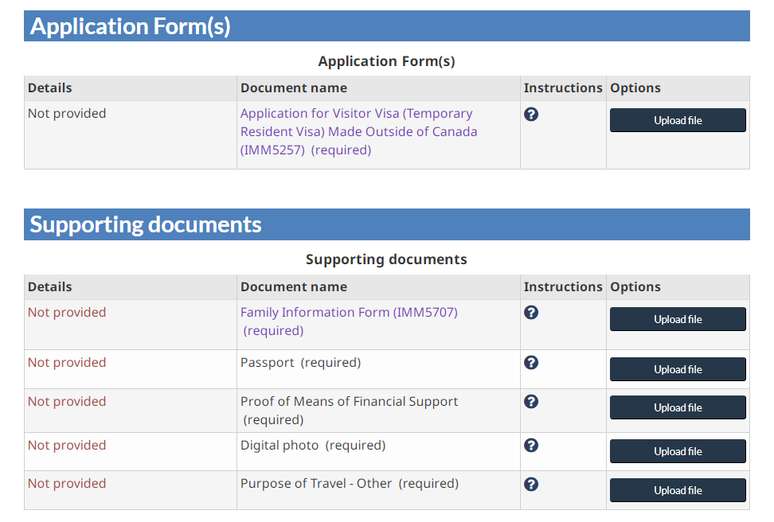
Each type of visa requires the submission of different documents. For a tourist visa, you need to fill out two forms digitally: IMM5257 has ten question sections. In Personal data Enter your full name, date of birth, citizenship, country you currently reside in, and marital status.
Languages It asks you what your native language is and whether you can communicate in English and French. At the moment, Passport asks for your passport details. Your ID information has been entered National identity document . The section US PR card asks you to say if you have a US green card and if so, enter the document number.
In Contact information you leave means of contact with you, such as postal address, telephone number and email. It is necessary to inform the purpose of travel to the country and the dates of departure and return Details of your visit to Canada . The section Education questions about their training e Occupation asks you to enter the works of the last ten years.
Finally, inside Basic information answer six questions about your health, criminal record, military service, history of political activity and whether you have ever been denied a visa application.
The other form required for a tourist visa is IMM5707, which must be filled out with information about your family. There are two sections of questions: in A , write your personal data, as well as those of your parents and your husband or wife; TO B , enter your children’s details. You need to digitally sign both forms and click on the “Validate” field once everything is filled out.
In addition to the forms, for a tourist visa, you must attach a scanned copy of your passport, financial proof that you can stay in the country, a photo and something that proves that you are traveling to Canada on a temporary basis, such as a return ticket return.
Step 7. Pay commissions
With a credit or debit card, you have to pay 100 Canadian dollars for the tourist visa and 85 for the biometrics. The other types of visas have other prices, see here.
Step 8. Plan biometrics
After paying the biometric fee, you will receive an email from the Canadian government and you will have 30 days to collect your biometric data. You must schedule pickup at a Canadian Visa Application Center (CVAC) on the VSF Global website (see cities in the table below). On the same day you will need to bring with you the printed email request from the Canadian government, your passport and the receipt for payment of the biometric fee.
Step 9. Collect your passport
You can track the status of your application on the government website. The average wait time for a visitor request to be reviewed is 80 days. Subsequently, it takes approximately 15 working days from the issuing of the visa to the date of collection of the passport at the CVAC. In most cases, an interview is not necessary to obtain a Canadian visa, but if the immigration officer determines that it is necessary, you will receive an email with instructions.
CVAC address
| Brasilia | Ed. Capital Financial Center – SIG Quadra 4 – Brasilia (DF) 70610-440 |
| Porto Alegre | Rua Dom Pedro II, 367, São João – Porto Alegre (RS) 90550-142 |
| Recife | Torre Janete Costa – R. Padre Carapuceiro, 968, Boa Viagem – Recife (PE) 51020-280 |
| Rio de Janeiro | Avenida Rio Branco, 156, Centro – Rio de Janeiro (RJ) 20040-901 |
| St. Paul | Itamaraju Building – R. Butantã, 434, Pinheiros – San Paolo (SP) 05424-000 |
Consulate addresses:
| Belo Horizonte | Automobile Club Building – Avenida Álvares Cabral 33, Center – Belo Horizonte (MG) 30170-000 |
| Rio de Janeiro | Av. Atlântica, 1130, 13th floor, Copacabana – Rio de Janeiro (RJ) 22021-000 |
| St. Paul | Nations Unidas Business Center – Torre Norte, Av. das Nações Unidas, 12901, 16th floor – San Paolo (SP) 04578-000 |
More information on the official Canadian government website on immigration and citizenship.
Source: Terra
Ben Stock is a lifestyle journalist and author at Gossipify. He writes about topics such as health, wellness, travel, food and home decor. He provides practical advice and inspiration to improve well-being, keeps readers up to date with latest lifestyle news and trends, known for his engaging writing style, in-depth analysis and unique perspectives.


