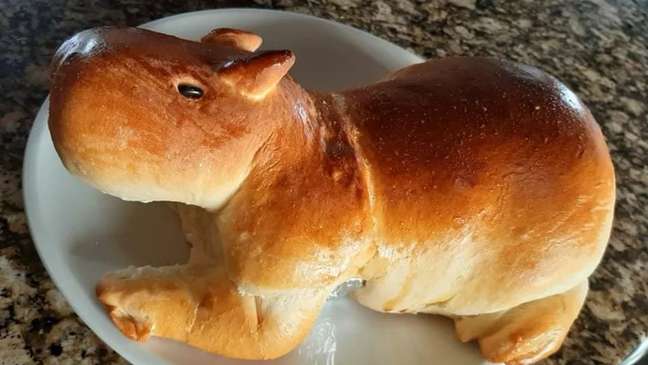
If you’ve been on social media for the past few years, you’ve probably come across some quirky recipes. One of these was created by Susan Jacomuni, who lives in Curitiba and decided to innovate in the kitchen with animal-shaped loaves. Have you ever heard of capybara bread? She did it!
According to Susan, it all started with the bird bread created by her grandmother in her childhood. When it was the turn to have children around her, with her goddaughter and granddaughter, she decided to create creative dishes to entertain the little ones. So he made loaves of turtle, panda, porcupine and many others.
Nonetheless, what ended up attracting the attention of the Internet was the capybara bread, or “pãopivara”. Susan’s husband was the one who made the unusual request for the animal, which is found in different regions of Brazil, including parks in the capital of Paraná.
If you liked Susan’s invention and want to try making your own capybara bread at home, we will teach you! The original recipe takes carbonated cheese and Blumenau sausage, but you can stuff it with whatever you want, he explains. Watch the step by step in the video below!
Now that you’ve seen the step-by-step video, see the complete recipe written below. Make sure you try this creative and different capybara bread!
Capybara Bread Ingredients:
Pasta
- 300 ml of hot milk
- 1 tablespoon of dry yeast
- 1 tablespoon of sugar,
- 2 tablespoons of olive oil
- 500 grams of wheat
- 1/2 tablespoon of salt
Filling
- broccoli
- carrot
- black olive
- cheese
Method of preparation:
Mix all the ingredients of the dough until it is homogeneous and unglued from your hands. Let the dough rest for 15 minutes, then knead and cut into four pieces (50% for the body of the capybara, 25% for the head, and the rest divided between legs and ears).
Open the body of the capybara only at the ends, leaving a triangle in the center for the filling. Close the dough with the filling, leaving a corner. Cut the end in half to form the arms of the capybara, cutting the ends three times for the fingers.
Roll up another piece of dough and cut three fingers at each end for the legs. Stuff the piece of dough for the head of the capybara, leaving two fingers of dough free, and close by rolling. Open one end to fit your body. Cut two triangles for the ears. With the rest of the dough, stuff and form a ball to support the body of the capybara.
Assemble the capybara in the mold, placing the body first. Then the legs and the support ball under the body. Use water to fit the open end of the head to the body, on top of aluminum foil for elevation. Also glue the ears with water. After the first modeling, let it rest for 30 minutes for the dough to rise.
Then perform the second modeling giving the final details of the capybara. Use the scissors to make swipes near the ears for the eyes with the beans. Draw the nose and nose of the capybara with the soy sauce. Bake in a preheated oven for 35 minutes at 200 ° C. Ok, now just serve your capybara bread!
Cooperation: Susan Jacomuni / Susan’s recipes
+The best content in your email for free. Choose your favorite Earth Newsletter. Click here!
Source: Terra
Benjamin Smith is a fashion journalist and author at Gossipify, known for his coverage of the latest fashion trends and industry insights. He writes about clothing, shoes, accessories, and runway shows, providing in-depth analysis and unique perspectives. He’s respected for his ability to spot emerging designers and trends, and for providing practical fashion advice to readers.


![Tomorrow belongs to us: What awaits you in the episodes of 2052 and 2053 on October 15, 2025 [SPOILERS] Tomorrow belongs to us: What awaits you in the episodes of 2052 and 2053 on October 15, 2025 [SPOILERS]](https://fr.web.img6.acsta.net/img/39/95/3995a2d00abbf3c01161818d01a95388.jpg)


